In today’s digital world, ensuring the safety of your children while they explore the online landscape is crucial. Whether you’re trying to limit their screen time, restrict access to inappropriate content, or monitor their online behavior, setting up parental controls on a Mac is a great way to ensure their digital safety.
MacRepair is here to help guide you through the process of setting up parental controls on your Mac to keep your kids safe and sound online. In this step-by-step guide, we will walk you through the process of setting parental controls and share some additional tips. Plus, if you need professional assistance, MacRepair offers a 30-minute service guarantee to get everything set up swiftly and easily.
![]()
Why You Should Set Up Parental Controls on Your Mac
Before we dive into the steps, let’s first understand why setting up parental controls on your Mac is so important:
- Internet Safety: Protect your child from potentially harmful websites, inappropriate content, and cyberbullying.
- Time Management: Set time limits on screen usage to help your child develop a healthy balance between digital activities and real-life engagements.
- App Control: Limit access to specific applications, games, or media that may not be appropriate for your child’s age.
- Monitor Online Behavior: Track what your child is doing online by monitoring their activity and usage.
Now that you understand the importance of parental controls, let’s jump into the process of setting them up on your Mac.
Step 1: Set Up a Managed User Account for Your Child
The first step in enabling parental controls on your Mac is to create a managed user account for your child. A managed account is an account that you control, allowing you to set various restrictions and monitor your child’s activity.
Here’s how to create a managed user account:
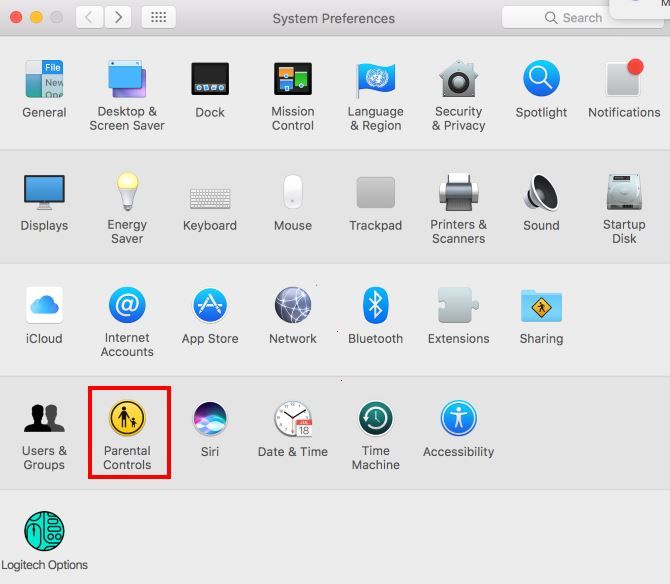
- Open System Preferences: Click on the Apple menu in the top left corner of your screen, then select System Preferences.
- Go to Users & Groups: In the System Preferences window, click on Users & Groups.
- Unlock Settings: To make changes, click the lock icon in the bottom-left corner and enter your administrator password.
- Add a New User: Click the + button located at the bottom of the user list.
- Select “Managed with Parental Controls”: From the drop-down menu next to New Account, choose Managed with Parental Controls.
- Create the Account: Enter the full name, account name, password, and password hint for your child’s account, then click Create User.
Now your child has their own managed user account, and you can begin customizing their settings.
Step 2: Enable Parental Controls for the User Account
Once you’ve created the managed user account, it’s time to enable and configure the parental controls. Follow these steps:
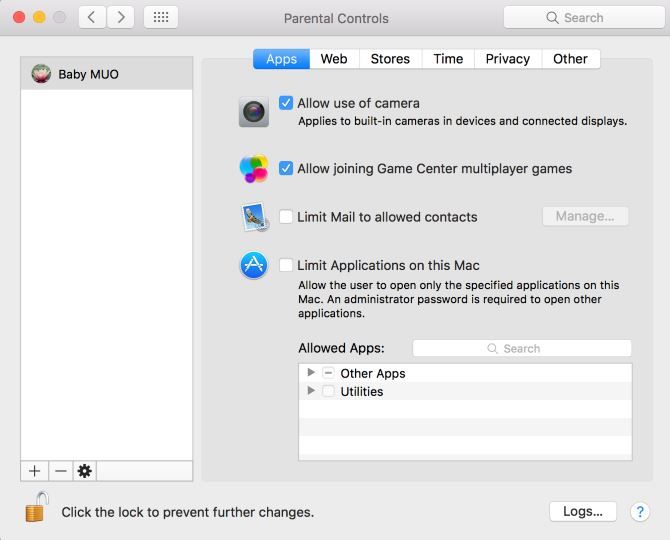
- Go to Parental Controls: In the Users & Groups section of System Preferences, select the newly created account for your child, then click Open Parental Controls.
- Enable Parental Controls: A window will pop up with a variety of settings you can adjust for the user account. Make sure Enable Parental Controls is checked.
- Set Up Restrictions: In the Parental Controls window, you will see several tabs to control different aspects of your child’s Mac experience:
- Apps: Control which applications and features your child can access. You can limit access to specific apps like Safari, iTunes, or the App Store.
- Web: Restrict websites based on categories such as adult content, gambling, and violence. You can also manually add websites to allow or block.
- Stores: Limit your child’s ability to purchase or download apps, games, or media from the App Store.
- Time: Set limits on the amount of time your child can spend on the Mac. You can set a daily usage time limit or schedule specific times of day when they can use the computer.
- Privacy: Control what personal information and data your child can share. You can disable access to location services, contacts, and other private data.
- Other: This section allows you to set restrictions on file sharing, allow or block other user accounts, and more.

Step 3: Set Screen Time Limits and Scheduling
An important feature of macOS’s parental controls is the ability to set screen time limits. You can restrict how long your child can use their Mac or schedule specific times of day for computer usage. Here’s how to set these limits:
- Go to the Time Tab: In the Parental Controls window, click on the Time tab.
- Set Time Limits: You can define specific time limits by dragging the sliders to set daily limits for weekdays and weekends. You can also block access to the Mac during certain hours (like bedtime or school hours).
- Configure Bedtime: Set a Bedtime for your child, where the Mac will automatically lock, ensuring they’re not tempted to stay up late using the computer.
- Set Downtime: Use Downtime to set hours when the Mac can’t be used. This feature is helpful for ensuring your child is not using the computer during critical times, such as study hours or after bedtime.
Step 4: Monitor Activity with Reports
Once parental controls are set up, you can monitor your child’s activity and receive detailed usage reports. This is a great way to keep track of how they’re using the Mac and ensure they’re adhering to the set limits.
- View Reports: In the Parental Controls section of System Preferences, click on the Activity tab.
- Review Usage: Here, you’ll see reports of app usage, website visits, and overall screen time for your child’s account.
- Adjust Settings: Based on the report, you can adjust the time limits, app restrictions, or web access as needed.
Step 5: Use Third-Party Parental Control Software (Optional)
While the built-in parental control tools in macOS are robust, you may want to consider adding an extra layer of protection with third-party parental control software. These apps can provide additional features like detailed tracking, geo-fencing, and more.
Some top third-party parental control software options include:
- Qustodio
- Norton Family
- Net Nanny
- Bark
These tools allow for more comprehensive monitoring and protection, especially if you want to manage multiple devices and platforms.
Step 6: Reassess and Update Parental Controls Regularly
As your child grows, their needs and online habits will change. It’s essential to review and update the parental control settings periodically to ensure they remain relevant and effective. Revisit the settings every few months to make adjustments as necessary, especially if your child has outgrown certain restrictions or if new content categories become relevant.
Need Help Setting Up Parental Controls? Contact MacRepair!
Setting up parental controls on your Mac may seem like a simple process, but for some, it can be a bit overwhelming. MacRepair is here to help you get everything set up correctly with ease. Whether you need assistance setting up screen time limits, restricting access to websites, or using third-party software, our expert technicians are just a call away.
Call us now at +971 52 123 4567 and let us help you set up comprehensive parental controls on your Mac to ensure your child’s online safety. We offer a 30-minute service guarantee, so we’ll get everything up and running in no time.
Why Choose MacRepair for Parental Control Setup?
- 30-minute Service Guarantee: We’ll have everything set up in just 30 minutes.
- Expert Technicians: Our team is experienced with macOS and can handle all your needs.
- Affordable Pricing: We offer competitive pricing without compromising quality.
- Customer Satisfaction: We pride ourselves on customer satisfaction and will work with you to ensure your child’s safety online.
Conclusion
Setting up parental controls on your Mac is an important step in protecting your child from online dangers. By following the step-by-step instructions outlined in this guide, you can create a safe digital environment for your child while giving them the freedom to explore the online world responsibly.
Call us today at 0800 585 222 or visit us at MacRepair Store—we’re here to ensure your child’s digital safety!