Are you frustrated by the dreaded Mac Error Code 1309? You’re not alone! This pesky error can leave even the most tech-savvy users scratching their heads, interrupting your workflow and causing serious headaches. But fear not—help is at hand! In this comprehensive step-by-step guide, we’ll walk you through the ins and outs of resolving Error Code 1309, turning your frustration into triumph. Whether you’re a seasoned Mac user or just getting started, our straightforward solutions will have you back on track in no time. Say goodbye to confusion and hello to smooth sailing with your Mac once again! Let’s dive in and conquer that error together!
Introduction to Mac Error Code 1309
If you’ve encountered the dreaded error code 1309 on Mac, you’re not alone. This pesky issue can pop up unexpectedly, leaving you frustrated and unsure of how to proceed. Whether you’re trying to access a file or launch an application, this error can create roadblocks that disrupt your workflow. But don’t worry—understanding what causes error code 1309 on Mac is the first step toward resolving it. In this guide, we’ll break down everything you need to know about this common problem and provide a clear, step-by-step approach for fixing it. So grab your favorite beverage and let’s dive into the world of troubleshooting!
Understanding the Causes of Error Code 1309
Error code 1309 on Mac can stem from various issues that disrupt file operations. One common cause is incompatibility between the application and specific files or formats. If you’re trying to open a file that’s not supported, this error may pop up.
Another frequent culprit involves corrupted files. When data becomes damaged, your system struggles to process it correctly, leading to frustrating interruptions.
Additionally, insufficient disk space can trigger error code 1309. When your hard drive is nearly full, the operating system might fail to read or write files as intended.
Software glitches also contribute to these errors. Bugs in applications can create unexpected behavior during tasks like transferring or saving documents.
Understanding these underlying causes helps pinpoint solutions faster without unnecessary troubleshooting steps.
Step-by-Step Guide to Resolving Mac Error Code 1309
To tackle Mac error code 1309, start by checking for software updates. This ensures your system is running on the latest version, which can resolve many issues.
Next, clear temporary files and cache. These often accumulate over time and can lead to performance problems. Use built-in tools or third-party apps to clean up efficiently.
Repair disk permissions next. Sometimes incorrect permissions can trigger this error. Access Disk Utility from Applications > Utilities, select your hard drive, and run the repair option.
Running a Disk Utility check is also essential. This process scans for any errors within your file system that could be causing the issue.
For those comfortable with command lines, use Terminal commands to address specific problems linked to error code 1309 on Mac.
If nothing seems effective yet, consider reinstalling the application or updating macOS itself as a last resort approach.
– Check for Software Updates
Keeping your Mac operating system up to date is crucial. Software updates often contain bug fixes and improvements that can directly address issues like error code 1309 on Mac.
To check for updates, click on the Apple logo in the top left corner of your screen. Navigate to “System Preferences,” then select “Software Update.” Your Mac will automatically search for available updates.
If any are found, you’ll have the option to install them right away or schedule a time that suits you better. Installing these updates not only helps resolve current errors but also enhances overall performance and security.
Don’t forget to restart your computer after installation if prompted. This ensures all changes take effect properly, potentially eliminating persistent errors from affecting your work again.
– Clear Temporary Files and Cache
Clearing temporary files and cache can often resolve Mac error code 1309. Over time, these files accumulate and may cause conflicts within your system.
To start, open Finder. Navigate to your “Go” menu while holding down the Option key. Click on “Library.” Inside the Library folder, locate both the “Caches” and “Application Support” folders.
Once you find them, you can safely delete the contents of these folders. Remember that it’s essential not to remove entire folders; just clear out their contents for a fresh start.
After you’ve cleared those caches, empty your Trash to free up space completely. Restarting your Mac afterward ensures any lingering issues are fully resolved.
This simple step can refresh application performance and help eliminate pesky error code 1309 on Mac systems. Regular maintenance like this keeps everything running smoothly!
– Repair Disk Permissions
Repairing disk permissions can often resolve the pesky error code 1309 on your Mac. This error typically arises from misconfigured file access rights, preventing applications from functioning properly.
To start, open the Disk Utility app found in Applications > Utilities. Once there, select your main hard drive. You’ll find a “First Aid” option that allows you to check for issues.
Running First Aid will analyze and repair any permission problems automatically. It’s a straightforward process that requires minimal intervention on your part.
After completing this step, restart your Mac and try accessing the application again. If everything goes smoothly, you might have successfully resolved the issue without further complications.
This approach not only tackles immediate problems but also helps maintain overall system health by ensuring proper access control across files and applications.
– Run a Disk Utility Check
Running a Disk Utility check can be an effective way to resolve Mac error code 1309. This built-in tool scans your disk for issues and repairs them automatically.
Start by opening Finder, then navigate to Applications. From there, go to Utilities and select Disk Utility. Once it’s open, you’ll see a list of available disks on the left sidebar.
Choose the disk that’s causing trouble—likely your main drive—and click on “First Aid.” This option will initiate the scanning process. It examines file system integrity and checks for errors in directory structures.
After running the check, it may take some time depending on how much data is stored. If any issues are found, Disk Utility will attempt repairs right away.
It’s essential not to interrupt this process; let it finish completely to ensure all potential problems are fixed effectively.
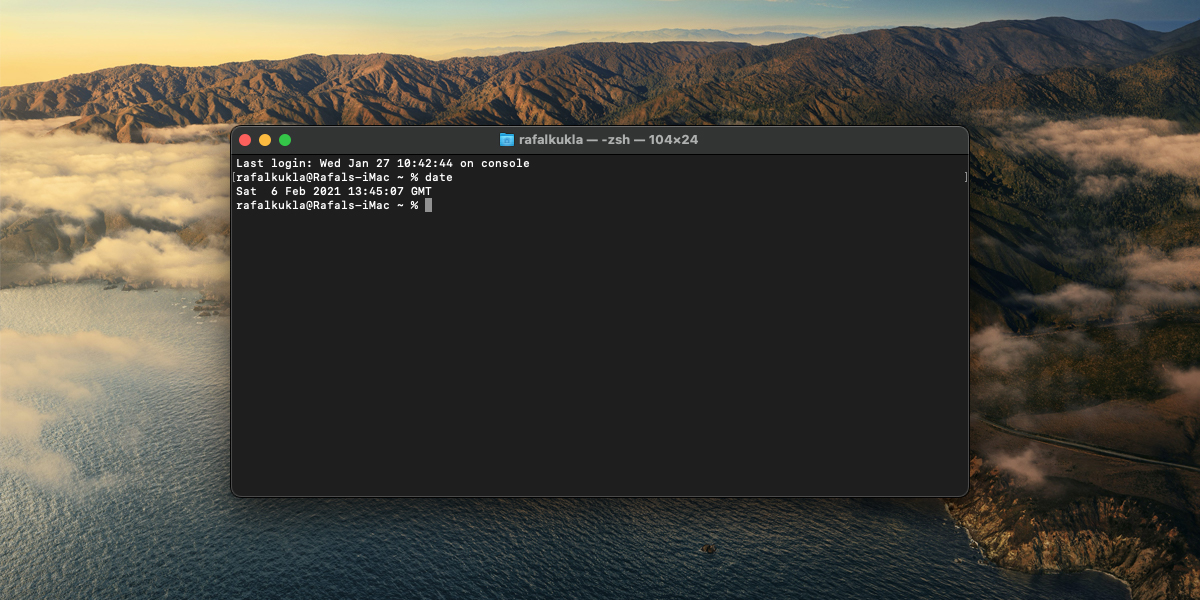
– Use Terminal Commands to Fix the Error Code
Using Terminal commands can be a powerful way to address error code 1309 on your Mac. This method may seem daunting, but it’s straightforward once you get the hang of it.
First, open the Terminal application by navigating to Applications > Utilities > Terminal.
To begin resolving the issue, try using the `fsck` command. Type `sudo fsck -fy`, then enter your administrator password when prompted. This command checks for file system errors and attempts repairs.
Another useful command is `diskutil`. You can run `diskutil verifyVolume /` followed by `diskutil repairVolume /`. These will check and fix any disk-related issues that might be causing error code 1309.
Remember to always use caution with Terminal commands as they can significantly affect your system if used incorrectly.
– Reinstall the Application or Update macOS
If you’ve tried all the previous steps and still encounter error code 1309 on Mac, it might be time to consider reinstalling the application that’s causing issues. Begin by removing the app from your system. Drag it from your Applications folder to the Trash, then empty the Trash to ensure complete removal.
After that, download a fresh copy of the application directly from its official website or through trusted sources like the App Store. Install it again and check if this resolves your issue with error code 1309.
Alternatively, updating macOS could also do wonders for resolving compatibility issues. Go to System Preferences and select Software Update. If there’s an update available, proceed with downloading and installing it.
Keeping both applications and your operating system updated is crucial for optimal performance and stability on your Mac. This proactive approach can greatly reduce errors in general.
Tips for Preventing Future Occurrences of Error Code 1309
To keep error code 1309 from creeping back into your Mac experience, consider a few proactive measures.
First, maintain regular software updates. This helps ensure your system runs smoothly and reduces compatibility issues that can trigger errors.
Next, perform routine maintenance on your applications. Clear out unnecessary files and regularly check for application updates to avoid potential glitches.
Backing up data is crucial too. Using Time Machine or other backup solutions can save you valuable information in case of unexpected issues.
Consider organizing files within well-structured folders. A cluttered desktop or disorganized file system can lead to access problems and increase the likelihood of encountering errors.
Lastly, monitor disk space frequently. Keeping ample free space allows macOS to operate efficiently and minimizes the risk of running into error codes like 1309 again.
Additional Resources for Troubleshooting Mac Errors
When dealing with Mac errors, having the right resources can make all the difference. Apple’s official support page is a treasure trove of information. It offers troubleshooting articles, user forums, and direct support options.
For those who prefer community input, consider exploring popular forums like MacRumors or Stack Exchange. Often, other users have faced similar issues and can provide valuable insights.
YouTube also hosts numerous tutorial videos that walk you through diagnosing and resolving various Mac errors step-by-step. Visual learning can be particularly helpful for complex problems.
Lastly, don’t overlook third-party applications designed to optimize and repair your Mac. Many tools are available that focus on system maintenance to prevent future errors from cropping up unexpectedly.
Conclusion
Mac error code 1309 can be a frustrating issue that disrupts your workflow. However, understanding its causes and following the outlined steps can help you effectively resolve it. By keeping your software updated, clearing temporary files, and running disk checks regularly, you can minimize the chances of encountering this error again.
If problems persist after trying these methods, don’t hesitate to consult additional resources or reach out to Apple Support for further assistance. With patience and the right approach, you’ll soon have your Macbook back in top shape, ready to tackle any task ahead.